First with my family, and now as empty nesters, my buddy and I take a lot of pride in our Halloween pumpkin carving. Over the past decade, I have amassed pumpkin stencils from websites, magazines, pumpkin carving kits, and Halloween books, as well as a bunch of tools. Below is our 2014 pumpkin collection with soccer and San Francisco Giants themes.
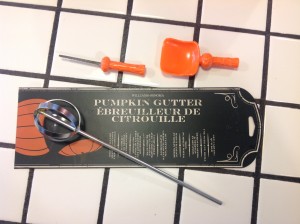
I always shop for new tools AFTER the Halloween season is over, when products are discounted to clearance prices. Last year, I picked up the pumpkin cutter shown below at Williams-Sonoma. If you are having trouble getting the man of the house involved, this tool may draw him in. It is basically a foot-long drill bit that you insert into a heavy duty electric drill. Scrapping the inside is my least favorite job. So I’m happy to have my buddy use this tool to clean out the pumpkin seeds and stringy gooey pulp (mesocarp and endocarp).
 I was impressed how well the pumpkin cutter pulverized the goo without harming the seeds. It simplified cleaning the seeds for toasting. You can also use it to shave down the walls to 1″ thickness, although we didn’t do this.
Another approach that appeals to men is to use a Dremel tool to carve out the stencil patterns. My buddy likes using this, but I find it makes rather jagged lines. You can tell the difference in the photo of our 2014 pumpkins. My cat face has very clean lines as compared to the dremeled pumpkin face next to it. In the pumpkin cutter photo, are the inexpensive plastic tools I typically use to carve out the details and scoop out the insides. I also use a nail to outline the stencil lines. The small serrated cutting tool in the photo is very accurate, but these usually only last through 1-2 pumpkins. You can often buy these tools for just a few dollars after Halloween.
Pumpkin Seeds Recipe
Oh, and this year I made the best pumpkin seeds ever. I put all the seeds in a large bowl, covered with warm water, added salt, let them soak, and then stirred the seeds around. Most of the pulp sank to the bottom and the seeds floated to the top. I used a small strainer to scoop the seeds off into a large strainer. Then I put the seeds back into the large bowl and repeated the process of soaking and straining. After this second round, I put the seeds in a large aluminum pan, sprinkled garlic salt on them, and put the pan in the oven at 250 degrees F. I stirred the seeds every 20 minutes until lightly toasted and very dry. It took about 90-120 minutes.


